Are you ready to tackle those home repairs but feel unsure about using a drill? You’re not alone.
A drill is one of the most powerful tools you can have, yet many people hesitate to pick it up. Imagine fixing a loose shelf, hanging a picture frame, or assembling furniture with confidence and ease. This guide will show you exactly how to use a drill safely and effectively, so you can save time and money on your home projects.
Keep reading, and you’ll discover simple tips that make using a drill straightforward—even if you’ve never held one before.
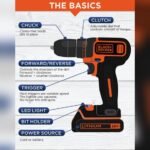
Choosing The Right Drill
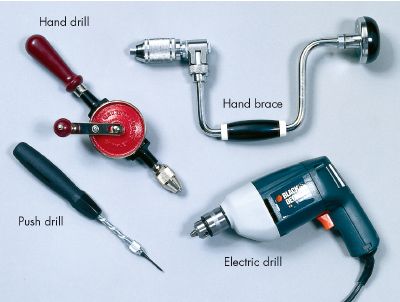
Choosing the right drill is the first step for any home repair. The right tool makes work easier and faster. It also helps avoid mistakes and damage. Understanding different drills and bits helps you pick the best one for your tasks.
Corded Vs Cordless
Corded drills plug into power outlets. They provide constant power without needing charging. These drills are good for long or heavy jobs. Cordless drills run on batteries. They offer more freedom to move around. Batteries need charging, so work time can be limited. Choose corded for power and cordless for flexibility.
Drill Types And Uses
There are several drill types for home repairs. A standard drill is good for wood and metal. A hammer drill adds a pounding action. It drills into tough materials like concrete. A right-angle drill fits tight spaces. Pick the type that matches your project needs.
Essential Drill Bits
Drill bits come in many shapes and sizes. Wood bits have a sharp point for clean holes. Metal bits are strong and heat-resistant. Masonry bits have a tough tip for stone and brick. Having the right bit makes drilling easier and safer. Keep a small set of basic bits ready at home.

Credit: merittonbritish.ac.th
Safety Tips Before Drilling
Before starting any drilling task, safety must come first. Drills are powerful tools that need careful handling. Taking simple safety steps helps prevent accidents and injuries. It also makes your work easier and more efficient. Follow these safety tips to prepare yourself and your work area before drilling.
Protective Gear
Wear safety glasses to protect your eyes from dust and debris. Use ear protection to reduce noise from the drill. Gloves can protect your hands but should fit well to avoid slipping. Wear a dust mask if you drill materials that create dust. Choose sturdy shoes to protect your feet from falling objects.
Checking The Work Area
Clear the area of any clutter or loose objects. Make sure the surface you drill is stable and secure. Check for hidden wires or pipes inside walls before drilling. Use a stud finder or similar tool for safety. Ensure good lighting to see clearly while working.
Proper Handling Techniques
Hold the drill firmly with both hands for control. Keep your body balanced and feet shoulder-width apart. Start drilling at a slow speed and increase as needed. Do not force the drill; let it work at its own pace. Always unplug or remove the battery before changing drill bits.
Basic Drilling Techniques
Basic drilling techniques are essential for home repairs. They help you work safely and get good results. Understanding how to use a drill properly saves time and avoids damage. This section covers key steps for drilling simple, clean holes in your walls or wood.
Marking The Spot
Start by marking the exact spot to drill. Use a pencil or marker for clear visibility. A small indentation with a nail or an awl prevents the drill bit from slipping. This step improves accuracy and keeps the drill steady at the start.
Controlling Speed And Pressure
Set the drill to a slow speed for better control. Apply gentle, steady pressure. Pressing too hard can break the drill bit or damage the material. Let the drill do the work. Adjust speed based on the material you are drilling.
Drilling Straight Holes
Keep the drill perpendicular to the surface. Hold it steady to avoid angled holes. Use both hands if needed for extra control. Check the angle often during drilling. Straight holes make it easier to fit screws or anchors securely.

Credit: www.nicos-shrimps.com
Common Home Repair Projects
Using a drill makes many home repairs easier and faster. You can handle simple projects yourself. This saves time and money. Here are common home repair tasks where a drill helps a lot.
Hanging Shelves And Pictures
Drills help make holes in walls for screws and anchors. This holds shelves and pictures firmly. Choose the right drill bit for your wall type. Use a level to keep shelves straight. Drills speed up the work and improve accuracy.
Assembling Furniture
Many furniture pieces need screws to join parts. Using a drill speeds assembly and reduces effort. Choose a screwdriver bit that fits screws well. Keep screws tight but avoid over-tightening. A drill makes furniture assembly smooth and quick.
Fixing Loose Fixtures
Loose fixtures like cabinet handles or door hinges cause problems. Drills help tighten or replace screws easily. Remove old screws with the drill if needed. Secure fixtures firmly to avoid future issues. Drills make fixing loose parts simple and efficient.
Maintenance And Care For Your Drill
Taking care of your drill keeps it working well for a long time. Simple steps can prevent problems and save money. Regular maintenance helps the drill stay strong and ready for any job.
Cleaning Tips
Remove dust and dirt from the drill after each use. Use a dry cloth or a small brush to clean the vents and body. Avoid water or liquid cleaners that may damage the drill. Clean the drill bits separately to keep them sharp and safe.
Battery Care
Charge the battery fully before using the drill. Do not let the battery drain completely. Store batteries in a cool, dry place to keep them healthy. Remove the battery from the drill if not using it for a long time. Use the charger made for your drill’s battery only.
Storing Your Drill Safely
Keep the drill in a sturdy case or box to protect it. Store it in a dry, cool place away from moisture. Avoid leaving the drill in direct sunlight or extreme heat. Organize drill bits and accessories to prevent damage or loss. Safe storage helps your drill last longer and work better.
Credit: home.howstuffworks.com
Frequently Asked Questions
What Safety Tips Should I Follow When Using A Drill?
Always wear safety goggles and gloves to protect yourself. Keep hair and loose clothing away from the drill. Use the correct drill bit for your task and ensure the drill is in good working condition before use.
How Do I Choose The Right Drill Bit For Repairs?
Select drill bits based on the material you’re working with, such as wood, metal, or masonry. Match the bit size to your screw or hole requirement. Using the correct bit ensures clean holes and prevents damage.
Can I Use A Drill For Both Drilling And Driving Screws?
Yes, most drills have adjustable settings for drilling holes and driving screws. Use a drill bit for holes and a screwdriver bit for screws. Adjust torque settings to avoid overdriving or stripping screws.
How Do I Maintain My Drill For Long-term Use?
Keep your drill clean and dry after each use. Regularly check and replace worn-out drill bits. Store it in a safe, dry place and charge batteries properly if it’s cordless.
Conclusion
Using a drill makes many home repairs faster and easier. Always choose the right drill bit for each task. Keep safety in mind by wearing protective gear. Practice on scrap materials before starting your project. With patience and care, you can fix things yourself.
Small repairs can save money and give you confidence. Keep your drill charged and well-maintained for best results. Home repairs become less stressful with the right tools. Try simple projects first and build your skills over time.

Michael Harris is an experienced woodworker and power tool expert with over 12 years in woodworking. Specializing in functional, high-quality furniture, he offers expert advice on tool selection, maintenance, and sharpening for both beginners and professionals.