3PK Mower Blade Setup: Easy Guide for Perfect Cut
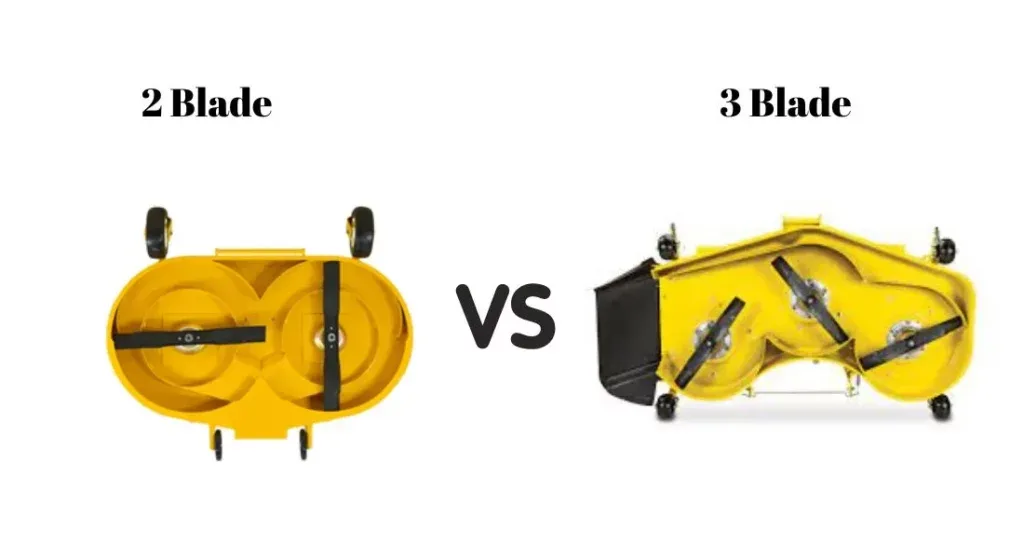
Getting a 3pk mower blade setup right can mean the difference between a clean cut and a striped, uneven lawn. If you've ever wrestled with three blades that don't seem to line up or heard a worrying vibrate while mowing, you're not alone. The process sounds straightforward, but the devil lives in the details, especially when your mower has a triple-blade deck that demands each blade face the right way.
Manufacturer specifications indicate that most riding mowers use one of two center-hole sizes (1-1⁄4" or 1-7⁄8") and require torque values between 35 and 70 ft-lbs depending on the model. That variance alone is enough to cause problems if you guess. Below, we'll walk through exactly how to identify your setup, install the blades correctly, avoid the mistakes that cost time and money, and understand what a quality 3-pack actually runs you.
Image source: Web (Bing) / lawnask.com (Web image (fair-use with source credit))
What You Need to Know Before You Start
A 3-pack of mower blades isn't just three identical blades you drop in and go. The first thing most people miss is that each blade in a triple-deck setup may be a different shape. One might be a mulching blade, another a high-lift discharge blade, and the third a mid-lift general-purpose blade.
Mixing them up creates uneven airflow under the deck. That uneven flow causes poor cut quality and puts extra stress on your spindles.
You also need to understand rotational direction. Every mower blade spins in one specific direction. For the vast majority of riding mowers, the left-side blade spins counter-clockwise, and the right-side blade spins clockwise.
The center blade often matches one side or the other depending on the deck design. If you install even one blade backward, you'll get poor grass lift, scattered clippings, and a rough-cut finish. Some decks also have staggered blade positions to maximize coverage.
That's part of why following your operator manual matters more than guessing from a YouTube video.
Before you buy blades or pop the deck, write down three things: your mower model number, your deck number, and the part number stamped on your current blades. Those four pieces of information are the only reliable way to ensure you order the right 3-pack. You can find your model and deck numbers on a sticker under the seat or on the rear of the deck itself.
If your blades already have numbers stamped into the metal, photograph them. Those numbers tell you the exact blade profile and length your deck was designed for.
You should also check whether your deck is a fixed deck or a floating deck. Fixed decks hold the blade height in place with link arms. Floating decks pivot freely and follow ground contours.
The blade installation process is the same for both, but floating decks can shift slightly when you remove the old blades. That means you'll want to take a photo of how everything sits before you start. A quick reference picture saves you from second-guessing belt routing or linkage positioning later.
Finally, consider whether all three blades truly need replacing. If one blade is nicked beyond repair and the other two still cut cleanly, you don't have to replace them all. However, running a mix of sharp and dull blades throws off the balance of your deck.
That imbalance vibrates your spindle bearings faster than normal wear would. For that reason, most experienced owners replace all three at the same time when the oldest blade is within striking distance of needing work anyway. That approach keeps everything balanced and extends the life of your spindle assemblies.
How to Identify Your Exact Setup
The single biggest source of confusion in a 3pk mower blade setup is simply getting the wrong blade for your deck. Two mowers from the same brand can use completely different blade profiles even if they share the same model year. The only reliable way to avoid this is to cross-reference your mower's model and deck numbers against the blade specifications before you order or install anything.
Start by locating your mower model number. It's usually on a plate near the steering column or under the seat. Then find your deck number, which is typically cast into the deck housing or listed on a metal tag.
These two numbers together pinpoint your exact deck configuration. Once you have them, pull up your manufacturer's parts diagram. Most major brands like John Deere, Cub Cadet, Toro, and Husqvarna host free parts lookup tools on their websites.
Enter your model number and the diagram will show you every blade your deck was originally configured with, including part numbers and orientations.
Next, inspect your existing blades for orientation markings. Most quality blades have an arrow stamped into the metal indicating the correct rotational direction. The arrow points in the direction the blade should spin.
When installed correctly, the raised cutting edge faces the bottom of the deck. The flat side faces upward toward the engine. If you're swapping blades and one lacks a marking, hold it up against another known-good blade to compare which side the cutting edge is on.
They should match across all three positions.
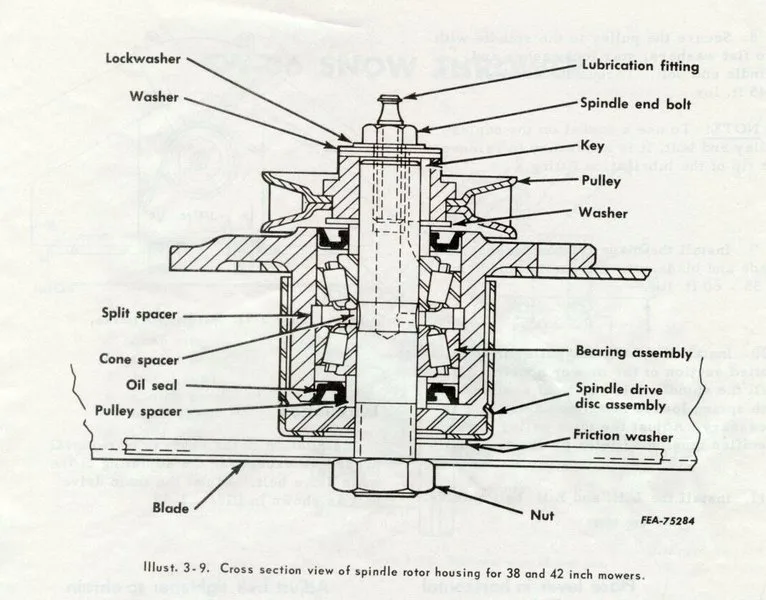
Image source: Web (Bing) / magna-matic-direct.com (Web image (fair-use with source credit))
Blade type is the next critical identifier. Mulching blades have a more curved underside that recirculates clippings for a fine chop. High-lift blades have steep fins that create strong upward airflow for bagging.
Low-lift or flat-pattern blades are designed for side-discharge setups and produce less vacuum. Using a mulching blade on a deck meant for bagging will leave clumps everywhere. Using a high-lift blade on a mulch-only deck will blow grass clippings around instead of chopping them.
Check what your original blades were and match that profile unless you're intentionally switching your deck's function.
Center hole diameter is another detail that trips people up. The two most common sizes are 1-1⁄4 inches and 1-7⁄8 inches. Some European models use metric sizes.
If your new blade's center hole doesn't match your spindle, it won't sit flat. A blade that doesn't sit flat wobbles. That wobble destroys spindle bearings and creates an uneven cut.
Measure your old blade's center hole with calipers if you're unsure. Don't guess.
If you'd like a deeper look at brand-specific setup procedures, our Ariens mower blade setup guide walks through the exact steps for those machines. Similarly, our RC mower blade setup article covers the balance and clearance considerations that apply across most deck types.
The Step-by-Step Installation Process
Installing a 3pk mower blade setup follows a clear sequence, and rushing any step leads to problems. The process starts long before you touch a wrench. You need the right tools, a safe workspace, and a plan for how you'll support the deck while you work.
Working on a flat, level surface is non-negotiable. An uneven surface makes it nearly impossible to get consistent blade clearance across all three positions.
Begin by disconnecting the ignition source. For gas mowers, remove the spark plug wire and tuck it away from the plug. For electric-start models, disconnect the battery terminals.
This eliminates any risk of the engine cranking while your hands are near the blades. If you're working with a DIY mower lift, now is the time to use it. Tilting the mower onto its side without draining fluids first can damage the carburetor and fuel system.
Always tilt the mower with the air filter and carburetor facing upward if you must reposition it without a lift.
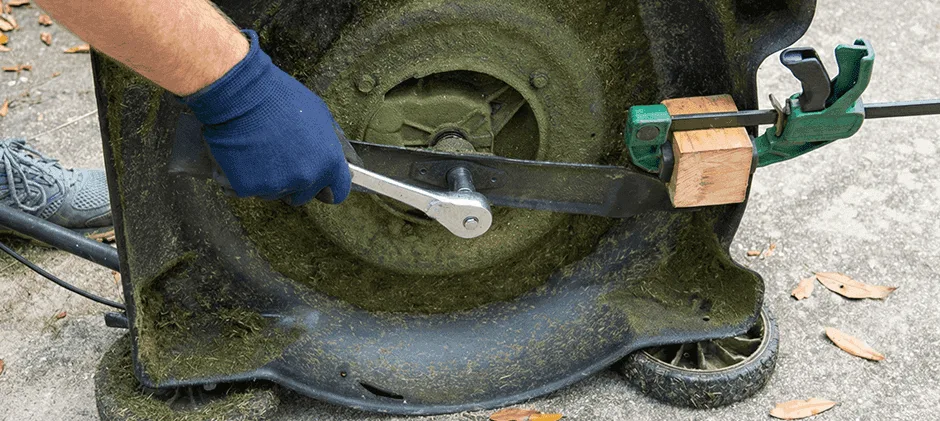
Image source: Bing (Web (fair-use with source credit))
Block each blade from rotating. You can use a wooden 2×4 jammed between the blade tip and the deck frame, or a dedicated blade-blocking tool. The goal is to keep the blade stationary while you loosen the center nut.
Use a ratchet with the appropriate socket, typically 13mm, 15mm, or 9/16" depending on your model. Turn counter-clockwise to loosen. The nut is often torched on tight from the manufacturer, so a breaker bar or a long cheater pipe on your ratchet may be necessary.
Apply steady force. Don't hammer the wrench.
Once the nut is loose, remove it along with any washers or adapters. Note the order and orientation of every piece. Take a photo before you set anything aside.
Some decks use tapered spacers or specialty washers that must go back in the exact same order. Missing a thin spacer by even a millimeter changes blade height and clearance.
Clean the spindle surface and the inside of the deck where the new blade will sit. Rust, packed grass, and debris prevent the blade from sitting flush. A wire brush or scraper works well.
If you've noticed heavy corrosion on your spindles, consider whether they still spin freely. Worn spindles introduce vibration that no new blade can fix. In that case, replacing the spindle assembly is the smarter move before installing fresh blades.
Install each new blade with the cutting edge facing the deck floor. Hand-tighten the nut first to thread it properly. Then torque it to the manufacturer's specification using a torque wrench.
Most riding mower blades require between 35 and 70 foot-pounds. Check your manual for the exact value. Over-tightening can stretch the spindle threads.
Under-tightening lets the blade work loose during operation, which is extremely dangerous.
After all three blades are on, check clearance. Lay the mower on its side (air filter up) and measure the distance from each blade tip to the nearest point on the deck floor. Most manufacturers recommend 1⁄4 to 3⁄8 inch on both sides.
Use a finger or a small metal ruler for this. If one side is too close, you'll need to adjust the deck height linkage or check whether the blade is seating properly on the spindle. After confirming clearance, manually rotate the entire deck by hand to ensure no blade contacts the deck at any point in the rotation.
Finally, reconnect the spark plug wire or battery, lower the deck to your desired cutting height, and start the engine at idle. Listen for unusual vibration. If something feels off, shut it down immediately and recheck your work.
A brief test run at low throttle confirms everything is secure before you commit to a full mowing session.
Common Mistakes That Cost Time and Money
The 3pk mower blade setup is straightforward in theory, but the margin for error is surprisingly wide. Most mistakes come from skipping one small step that turns a twenty-minute job into a frustrating afternoon. The good news is that every common error is preventable with a bit of discipline and attention to detail.
The most frequent mistake is installing blades in the wrong rotational direction. Many people assume all three blades face the same way because they look identical. They don't.
On a triple-blade deck, at least one blade often spins in the opposite direction from the others. Installing it backward creates a gap in the cut and sends clippings spraying in the wrong direction. Always verify the stamped arrow on each blade and confirm it matches the spindle's intended rotation.
Image source: Web (Bing) / jinshang.asia (Web image (fair-use with source credit))
Another costly error is mixing blade types across the deck. Some owners grab a three-pack from a big-box store without checking whether all three blades match their deck's original configuration. A mulching blade on the left, a high-lift on the right, and a flat-pattern in the middle will tear up your lawn.
The airflow under the deck becomes chaotic, and you'll see stripe patterns, unbagged clippings, and uneven grass heights. Stick to the blade profile your deck was designed for.
Torque mistakes are the third major pitfall. Several owners either hand-tighten the center nut and call it done or crank it down as hard as they can with an impact wrench. Neither approach is correct.
The nut needs to be snug enough to hold the blade firmly but within the specified torque range. Without a torque wrench, you're guessing, and guessing with a spinning blade is risky. A $20 torque wrench pays for itself the first time it prevents a loose blade from coming loose at operating speed.
Forgotten deck leveling is the fourth mistake. Replacing blades changes the effective blade height slightly, especially if your old spindles had accumulated wear. Skipping the deck-leveling step after installation means your mower will cut unevenly right from the first pass.
Use a tape measure to check the distance from each deck corner to the ground. Adjust the leveling nuts on the lift linkage until all four corners are within 1⁄8 inch of each other. This takes five minutes and saves you from a poorly cut lawn.
Ignoring worn spindle bearings is the silent killer of new blade investments. A blade that looks perfectly fine will wobble like crazy if the spindle beneath it has play. The vibration destroys the blade, the spindle seal, and eventually the deck itself.
Before installing new blades, grab each blade and try to wiggle it side to side. Any noticeable play means the spindle needs inspection or replacement first. New blades on bad spindles is a waste of money.
Finally, some people skip the post-installation balance check. Even a new blade can be slightly unbalanced from manufacturing. A simple balance test involves sticking a screwdriver or a dedicated blade balancer through the center hole.
A balanced blade stays level. If one side dips, that side is heavier and needs a small amount of metal removed from the heavier end with a file or grinder. Sharpening an unbalanced blade makes the problem worse, so balance first, sharpen second.
What It Actually Costs
Understanding the real cost of a 3pk mower blade setup helps you budget properly and decide whether DIY makes financial sense. Prices vary significantly based on blade type, brand, and whether you buy OEM or aftermarket. As of 2026, a basic aftermarket 3-pack for a standard riding mower typically runs between $30 and $60.
Premium mulching blades from OEM suppliers like John Deere or Kubota can push that range to $60 to $100 for the same three-pack. High-performance 3-in-1 blades from brands like Gator or Oregon often sit in the $50 to $80 range.
| Blade Type | Price Range (3-Pack) | Best For |
|---|---|---|
| Basic aftermarket standard | $30 – $50 | General bagging and discharge |
| Premium mulching blades | $50 – $80 | Fine chop and clip recirculation |
| OEM branded 3-in-1 | $60 – $100 | All-around performance |
| High-lift bagging blades | $40 – $70 | Heavy bagging applications |
The per-blade savings of a 3-pack over buying individually is usually about 15 to 25 percent. If a single blade costs $15 to $25 on its own, a three-pack at $40 to $70 represents a meaningful discount. That's the primary financial incentive for going with the pack.
However, the real cost question isn't just about the blades. It's about what happens when things go wrong. A single mistake, like torquing a nut to 100 ft-lbs and stretching the spindle threads, can cost $150 to $300 in mechanic labor to fix.
That's why investing in the right tools, especially a torque wrench and a blade balancer, makes economic sense. These tools cost $20 to $40 combined and prevent mistakes that run ten times that amount.
Shop labor for a professional blade replacement service typically runs $40 to $80 per hour, and most decks take 30 to 60 minutes to complete. That puts a full professional job at roughly $40 to $120 depending on your region and shop rate. Compare that to a $50 3-pack and a few hours of your own time, and the DIY path clearly wins on cost.
The trade-off is your time and the responsibility of getting it right.
Some owners also factor in the hidden cost of a bad cut. Uneven stripes, unbagged clippings, and premature spindle wear from incorrect installation all add up to a poorer lawn and earlier repairs. Getting the setup right the first time avoids those downstream expenses entirely.
If you'd like a deeper breakdown of current riding mower blade pricing, our pricing guide covers the latest market rates across major brands.
Frequently Asked Questions
Can I mix blade brands in a 3pk setup?
Yes, as long as all three blades share the same length, center-hole size, and mounting style. Mixing brands is fine for cost savings. However, consistent performance is more likely when all blades come from the same manufacturer.
Do I need to replace all three blades at once?
Not always. If two blades are still sharp and the third is damaged, you can replace just one. But mixing sharp and dull blades creates deck imbalance.
Most owners replace all three together to maintain even cutting and protect spindle bearings.
How often should I check blade balance?
Check balance every time you sharpen blades. If you never sharpen, inspect them seasonally or after any impact with debris. A simple blade balancer costs under $10 and takes thirty seconds to use.
What is the safe DIY limit for this job?
If your mower has a standard triple-blade deck, removal, installation, and torque verification are well within DIY range. If your deck uses a complex belt system, floating linkage, or specialty spindles, consider professional help. When in doubt, consult your operator manual before proceeding.
Final Decision Guide
Choose the DIY path if your mower has a standard deck, you have basic hand tools, and you can follow torque specifications. You'll save roughly $50 to $120 in labor and gain confidence for future maintenance. The full process takes about forty-five minutes for a first-timer and twenty minutes afterward.
Hand the job to a professional if your deck uses a floating suspension system, you notice excessive spindle play, or you feel uncomfortable working under a raised mower. A qualified technician will also verify deck alignment and belt condition while they're at it. That extra inspection catches problems before they become expensive repairs.
Whichever path you choose, double-check blade rotation direction and torque values before starting the engine. Those two steps prevent the majority of post-installation issues. Get them right, and your lawn will thank you with a clean, even cut all season long.

Ms.Sultana
Affiliate Marketer | SEO Specialist | Blogger at Elite Global Marketing Agency
Ms.Sultana brings over 16 years of expertise working with global Clients by providing different skills and Services. For the last 5 years working as an Affiliate marketer, specializing in high-ticket campaigns that drive exponential growth. She holds a degree in Computer Science and Engineering as well as achieved many more skills certificates from different institute/academies/Platform. As part of the Elite Global Marketing team, Sultana has helped clients generate millions in revenue through strategic partnerships, innovative funnels, and data-driven insights. She’s passionate about empowering businesses to scale by connecting them with the right affiliate opportunities.
Explore our resources or connect with us on LinkedIn to stay ahead in affiliate marketing.