
A jigsaw is one of the most versatile cutting tools in a DIYer’s workshop — it can handle curves, straight lines, plunge cuts and even bevels with surprising ease. But that agility comes with a responsibility: a jigsaw that’s used carelessly can kick back, bind, or throw debris in the blink of an eye. The good news is that a handful of deliberate safety habits, combined with a little tool knowledge, practically eliminate those risks. This guide walks you through every critical precaution, from selecting the right blade to securely storing the saw after the final cut. By the time you’re done reading, you’ll have a clear, actionable checklist that keeps your projects accurate, your fingers intact, and your confidence high.
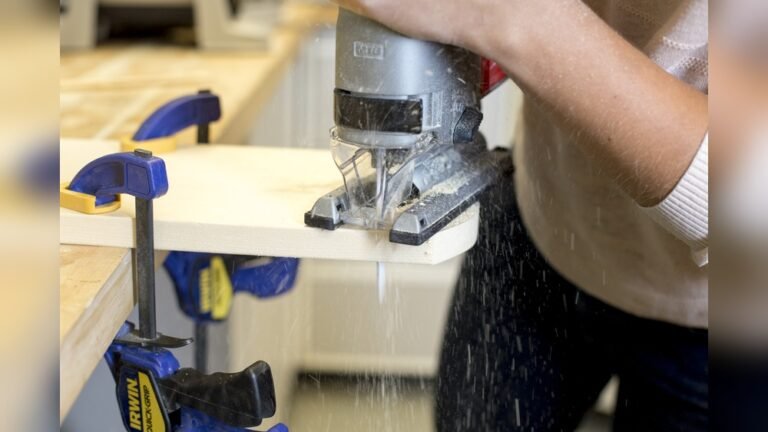
 Safety gear and a stable setup make all the difference.
Image source: blog.gooddayswork.ag
Safety gear and a stable setup make all the difference.
Image source: blog.gooddayswork.ag
Understanding Your Jigsaw: Types and Key Features
Before you even plug in the tool, it pays to understand what kind of jigsaw you’re holding and how its design influences safety. Jigsaws generally fall into two broad categories — corded and cordless — and the choice between them affects both mobility and control.
Corded jigsaws deliver consistent, unlimited power, which is a real advantage when you’re working through dense hardwoods or thick plywood for extended periods. Cordless models, on the other hand, give you the freedom to move around a cluttered garage or outdoor site without a trailing cable. Their performance depends heavily on the battery; if you’re using a cordless saw, knowing how to match a battery to your tool’s needs helps you avoid sudden power loss mid-cut, which can cause the blade to stall and jerk. For anyone weighing the pros and cons, a detailed look at corded versus cordless power can clarify which setup suits your workshop.
Beyond the power source, pay attention to the saw’s action. A straight (reciprocating) action moves the blade purely up and down, producing a finer cut with less tear-out. An orbital action adds a slight forward motion to the blade on the upstroke, which cuts faster but leaves a rougher edge. Many modern jigsaws let you switch between orbital settings, so you can dial in the behaviour that matches the material. Variable speed is another safety feature: starting at a lower speed on metal or plastic reduces the risk of the blade grabbing, while full speed works well in softwood. If you’re just starting out, a beginner-friendly model with intuitive controls and a good blade guide will help you build safe habits far more quickly than a high-end professional tool with a steep learning curve.
Choosing the Right Blade for the Job
The blade is the single most important factor in a safe, clean cut. A mismatched blade not only delivers poor results but also greatly increases the chance of kickback, burning, or wandering. Blades are defined by their material, tooth configuration, and shank style, and understanding these variables puts you firmly in control.
Teeth per inch (TPI) is the starting point. For fast, rough cuts in softwood, a blade with 6–10 TPI clears chips quickly and reduces heat. For finer work in plywood, laminates or hardwood, a 10–14 TPI blade yields a smoother edge. When you’re cutting sheet metal — a task that demands respect — use a blade with 18–24 TPI; the smaller teeth grip the metal more gently and dramatically lower the risk of the workpiece vibrating loose. If you frequently cut metal, a saw purpose-built for the task, like the one in our metal-cutting jigsaw recommendations, will have the blade clamp and speed range to handle it safely.
Blade material matters too. High-carbon steel blades are inexpensive and fine for softwood, but they dull quickly. Bi-metal blades combine a hardened tooth edge with a flexible body, making them tough enough for occasional metal work and long-lasting in wood. For ceramic tile or fiberglass, carbide-grit blades are essential. Always check the shank type: most modern jigsaws use T-shank blades that lock securely into the tool-free clamp, while older models may require U-shank blades with a set screw. A blade that isn’t fully seated in the clamp can eject during a cut — a serious hazard. Get into the habit of tugging firmly on the blade after installation to confirm it’s locked.
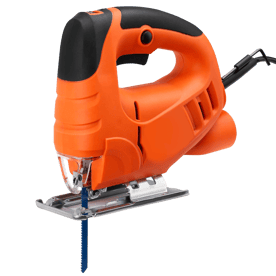
 A sharp, appropriate blade makes cutting almost effortless and far safer.
Image source: onevantool.com
A sharp, appropriate blade makes cutting almost effortless and far safer.
Image source: onevantool.com
Pre-Work Preparation: Setting Up Your Workspace
A tidy, well-thought-out workspace eliminates many of the most common jigsaw accidents before they happen. The goal is to create a stable, distraction-free zone where the saw and the material can’t move unexpectedly.
Start by clearing the bench of everything except the workpiece, clamps, and a square or straightedge. Loose tools, offcuts, and tangled cords are tripping hazards that can pull your attention — and your hands — away from the cut. If you’re using a corded jigsaw, route the power cord over your shoulder or behind you so it never drapes across the cutting path. Good lighting is non-negotiable: position a bright, adjustable lamp so the cut line is clearly visible from your natural stance, and avoid casting shadows directly over the blade.
Securing the material is the single most impactful safety step. Never hold the workpiece with one hand and operate the jigsaw with the other — that’s a recipe for a slip. Use at least two clamps to fix the stock to a sturdy work surface, and make sure the cut line overhangs the bench edge by at least 6 inches so the blade doesn’t contact the table. For long cuts, a straightedge clamp provides a solid fence and helps you achieve clean, straight lines without the blade wandering. On sheet goods, support the offcut with a roller stand or a second sawhorse to prevent the sheet from snapping off and pulling the saw backward at the end of the cut.
Dust and chip management is both a safety and a visibility issue. Jigsaws don’t have a built-in dust port on every model, but many accept a vacuum hose adapter. If yours does, connect a shop vac to keep the cut line clear and reduce airborne particles. When that’s not an option, stop every few feet to brush away debris with a bench brush — never use your fingers near the blade, even when the saw is off.
Personal Protective Equipment (PPE) That You Should Never Skip
Jigsaw injuries often involve eyes, hands, ears, and lungs, and all four are easily protected with the right gear. PPE doesn’t slow you down; it’s what lets you work confidently and without distraction.
Eye protection: Flying chips and fine dust are inevitable. Choose safety glasses with side shields or a full-face shield if you’re cutting metal or abrasive materials. Look for lenses that meet ANSI Z87.1 standards and resist fogging — a fogged-up lens is as dangerous as no lens at all. If you wear prescription glasses, use over-glasses goggles that fit securely.
Hearing protection: A jigsaw typically produces 85–95 decibels, which is loud enough to cause permanent damage over time. According to NIOSH guidance on noise exposure, exposure to 85 dBA for an eight-hour day is the threshold for hearing conservation. Earplugs with a Noise Reduction Rating (NRR) of 25 dB or higher are a lightweight option, while earmuffs provide a more consistent fit and can be paired with plugs for extremely loud tasks. The key is to wear them from the first cut to the last.
Respiratory protection: Cutting wood, MDF, or laminates releases fine dust that can irritate the lungs. A disposable N95 mask is a minimum for occasional use; for extended sessions or when working with MDF, a half-face respirator with P100 filters offers far better protection. If you’re cutting pressure-treated lumber or composites, respiratory protection is not optional.
Gloves and clothing: Work gloves give you a better grip on the tool and protect against splinters, but they should be snug and offer good dexterity — loose gloves can get caught in the blade. Avoid dangling sleeves, drawstrings, or jewellery. Roll up long sleeves past the elbows, and tuck in any shirt tails. Wear sturdy, closed-toe shoes that can withstand a dropped offcut.
Safe Operating Techniques: From First Cut to Last
Mastering a few core techniques transforms the jigsaw from a potentially unpredictable tool into a predictable extension of your hands.
Grip and stance: Grip the main handle with your dominant hand and place your other hand on the front knob or the top of the housing, well away from the blade path. Keep your index finger on the trigger and your thumb wrapped around the handle — never rest a finger on the blade guard. Stand with your feet shoulder-width apart, one foot slightly forward, and lean just enough to see the cut line without hovering your face over the blade. This balanced stance absorbs the saw’s vibration and lets you react smoothly if the tool tries to kick.
Starting the cut: Place the front edge of the shoe firmly on the workpiece, with the blade about ¼ inch away from the edge. Squeeze the trigger and let the blade reach full speed before it touches the material. Gently ease the saw forward until the blade bites, then maintain a steady, deliberate pace. Forcing the saw forward is a common mistake; it bends the blade, causing it to wander and overheat. Let the teeth do the cutting.
Making curves and bevel cuts: When cutting a tight radius, reduce the speed slightly and advance the saw smoothly without twisting it sideways. A narrow scroll-cut blade makes the job easier. For bevel cuts, unlock the shoe plate, set the desired angle — usually 15°, 30°, or 45° — and tighten the lever securely. A loose shoe will shift during the cut, throwing the angle off and increasing the risk of binding. Always test the bevel setting on scrap before cutting the final piece.
Stopping and restarting: Release the trigger and keep the saw flat on the workpiece until the blade coasts to a complete stop — usually about two to three seconds. Lifting the saw while the blade is still moving is a leading cause of scratched surfaces and cut fingers. If you need to restart mid-cut, back the saw up slightly, hold it steady, and let the blade reach full speed before moving forward again.
 Video demonstrations reinforce how to hold the saw and move through the cut.
Image source: www.youtube.com
Video demonstrations reinforce how to hold the saw and move through the cut.
Image source: www.youtube.com
Blade Maintenance and Replacement
A dull or damaged blade is more than an inconvenience — it’s a safety hazard. It forces you to push harder, generates excessive heat, and can suddenly snap under pressure.
Signs it’s time to change: If the saw is burning the wood instead of cutting, producing a ragged edge, or vibrating more than usual, the blade is likely dull. Inspect the teeth under a bright light: any chipped, bent, or missing teeth mean immediate replacement. Rust spots or discolouration from overheating are also red flags. In practice, a quality bi-metal blade cutting hardwood might last through 20–30 linear feet of ¾-inch stock, but always let the cut quality be your guide.
Safe blade replacement: Unplug the saw or remove the battery, then engage the blade-change mechanism. On most modern jigsaws, a tool-free lever flips open to release the old blade — keep your fingers clear of the sharp teeth. Insert the new blade with the teeth facing forward, push it all the way into the clamp, and release the lever. Tug the blade firmly to confirm it’s locked. If you’re unfamiliar with the process, the safe blade replacement steps for a circular saw share many of the same principles, though the clamping mechanism differs. After installation, manually rotate the blade guard to ensure nothing is obstructed. Never start the saw with the blade touching anything.
Handling Common Hazards
Kickback: Kickback occurs when the blade binds in the material and the saw is violently thrown backward. It’s most likely to happen during tight curves, when the blade is pinched, or when the workpiece isn’t properly supported. Keep the shoe flat on the material at all times, use a sharp blade, and never twist the saw sideways. If you feel resistance building, ease off the forward pressure and let the blade clear the kerf before continuing.
Electrical safety: For corded jigsaws, inspect the power cord before each use — look for cuts, kinks, or exposed wiring. Use a GFCI-protected outlet, especially in damp garages or unfinished basements. The OSHA hand and power tool safety guidelines stress that you should never carry a tool by the cord or yank the plug out of the socket. When cutting wallboard, be absolutely certain you know what’s behind the surface — jigsaw blades can easily contact live wires or plumbing.
Sparks and hot surfaces: When cutting metal, expect a shower of small, hot sparks. Keep a fire extinguisher rated for electrical and combustible fires nearby, and clear the area of flammable liquids and sawdust. While the jigsaw doesn’t produce the same volume of sparks as an angle grinder, many of the same precautions apply — understanding how to minimize spark hazards is a useful skill that carries over. After cutting metal, the blade and the shoe can remain hot for several minutes; let them cool before touching.
Dust and debris: Beyond respiratory protection, debris can accumulate on the shoe and obscure the cut line. Pause periodically to brush or blow the area clear. If your saw has a dust blower, keep it aimed at the line. Prolonged exposure to wood dust, especially from hardwoods like oak or tropical species, is a known sensitizer and potential carcinogen — don’t underestimate the value of good dust control.
Post-Cut Safety and Tool Storage
How you finish up is just as important as how you start. Once the cut is complete, release the trigger and wait for the blade to stop completely before setting the saw down. Place the tool on its side with the blade facing away from you, or use the built-in hang hook if your model has one. Never put the saw down while the blade is still exposed and hot.
Unplug the cord or remove the battery, then take a moment to clean the tool. Use a soft brush or compressed air to remove dust from the blade clamp, shoe, and ventilation slots — built-up debris can cause the blade clamp to jam or the motor to overheat. Wipe the body with a dry cloth; avoid solvents that could degrade the plastic housing. If your cordless jigsaw has been acting sluggish, it’s a good idea to check the battery’s condition before the next project.
Store the jigsaw in a dry, locked cabinet or a high shelf out of children’s reach. Coil the cord loosely — tight kinks can break the internal wires over time. If you store the saw with a blade installed, slide a piece of protective hose over the teeth or use a blade guard. A dedicated storage case, the kind often included in a starter tool kit, keeps the saw and its accessories organised and damage-free.
For DIYers building a workshop on a budget, affordable options for home projects demonstrate that you don’t need to spend a fortune to get a saw with solid safety features. The key is to pair any tool, regardless of price, with the habits described here.
Frequently Asked Questions
Do I need to wear a dust mask every time I use a jigsaw? For occasional cuts in solid wood, an N95 mask is a sensible precaution. If you’re cutting MDF, plywood with adhesives, or working for more than 30 minutes, upgrade to a half-face respirator with P100 filters. Dust control is as much about long-term lung health as immediate comfort.
Can I use the same blade for wood and metal? No, and doing so is unsafe. Wood blades have widely spaced teeth that will grab and shatter on metal, while metal blades are too fine-pitched to clear wood chips effectively. Always switch to a blade rated for the material you’re cutting.
What’s the safest way to make a plunge cut? Tilt the saw forward so the tip of the shoe rests on the workpiece with the blade parallel to the surface. Start the saw at full speed, then slowly lower the blade into the material, keeping the shoe firmly against the surface. Once the blade breaks through, level the saw and continue the cut. Practice on scrap until you’re confident, and never attempt a plunge cut without both hands on the tool.
How can I tell if my jigsaw’s orbital action is set correctly? Lower orbital settings (0–1) are for fine, controlled cuts; higher settings (2–3) are for fast, rough cuts in softwood. If the saw is vibrating excessively or leaving a very rough edge, reduce the orbital setting one step at a time until the cut quality improves.
Is it safe to let someone borrow my jigsaw? Only if they are familiar with the tool and you’ve confirmed they have the proper PPE. A jigsaw’s light weight can make it seem less dangerous than a circular saw, but it demands the same respect. If you’re lending it, include a quick demonstration of the blade clamp, speed control, and safe grip.
Conclusion
Jigsaw safety isn’t a set of temporary rules you follow until you feel “experienced enough” to ignore them. It’s a collection of small, consistent habits that become second nature: checking the blade, clamping the work, wearing your PPE, and respecting the tool’s speed and limitations. When you combine those habits with a properly chosen saw and the right blade for the material, you eliminate the vast majority of risks that trip up DIYers.
The payoff is enormous. You’ll cut faster, cleaner, and with far less fatigue. You’ll spend more time enjoying the creative side of your projects and less time sanding out mistakes or nursing injuries. The next time you pick up your jigsaw, run through the checklist in your head — clear workspace, secure material, sharp blade, safety gear, steady grip — and then make that first cut with the quiet confidence that you’re doing it right.

Michael Harris is an experienced woodworker and power tool expert with over 12 years in woodworking. Specializing in functional, high-quality furniture, he offers expert advice on tool selection, maintenance, and sharpening for both beginners and professionals.

