How to Care for Your Hand Tools: Cleaning, Rust Prevention, Storage, and Maintenance Tips
Hand tools last longer when you clean them after use, dry them fully, remove rust early, lubricate moving parts, sharpen cutting edges, inspect for damage, and store them in a dry place. A few minutes of regular care can protect your tools, improve performance, and make every DIY, woodworking, gardening, or repair job easier.
Whether you use hammers, screwdrivers, pliers, chisels, wrenches, saws, pruning shears, or garden tools, the same rule applies: well-maintained tools work better and stay safer.
Why Proper Hand Tool Care Matters
Proper hand tool care keeps tools safer, sharper, easier to use, and less likely to fail during work. The core routine is simple: clean tools after use, dry them fully, remove rust early, lubricate moving parts, sharpen cutting edges, inspect for damage, and store everything in a dry, organized place.
Hand tools may look simple, but they take a lot of stress. Dirt, moisture, pressure, dull edges, and poor storage can slowly damage metal parts, handles, joints, and cutting edges.
Good maintenance helps you:
- Prevent rust and corrosion
- Keep blades sharp and accurate
- Improve grip and control
- Reduce the risk of slips or tool failure
- Save money by replacing tools less often
- Keep your workspace cleaner and more organized
Think of tool care like brushing your teeth. Boring? Slightly. Worth it? Absolutely.
Ready to make your tools last a lifetime? Let’s dive in.

Credit: www.axminstertools.com
Choosing Quality Tools
Choosing quality tools is the first step to caring for them well. Good tools last longer and work better. They save time and effort. Poor tools break easily and cause frustration. Invest in tools that offer value and reliability. This helps keep your work smooth and safe.
Material Matters
The material of a tool affects its strength and durability. Steel tools resist rust and wear. Look for high-carbon steel or stainless steel. These materials stay sharp and strong over time. Plastic handles should be sturdy, not brittle. Avoid cheap metals that bend or break easily. Quality materials mean tools stay useful for years.
Ergonomic Designs
Ergonomic tools fit comfortably in your hand. They reduce strain and improve grip. Soft, non-slip handles help prevent accidents. Tools with balanced weight feel easier to control. Choose tools that match your hand size. Comfortable tools make work less tiring. This encourages careful, precise use. Ergonomic design protects your hands during long tasks.
Clean Hand Tools After Every Use
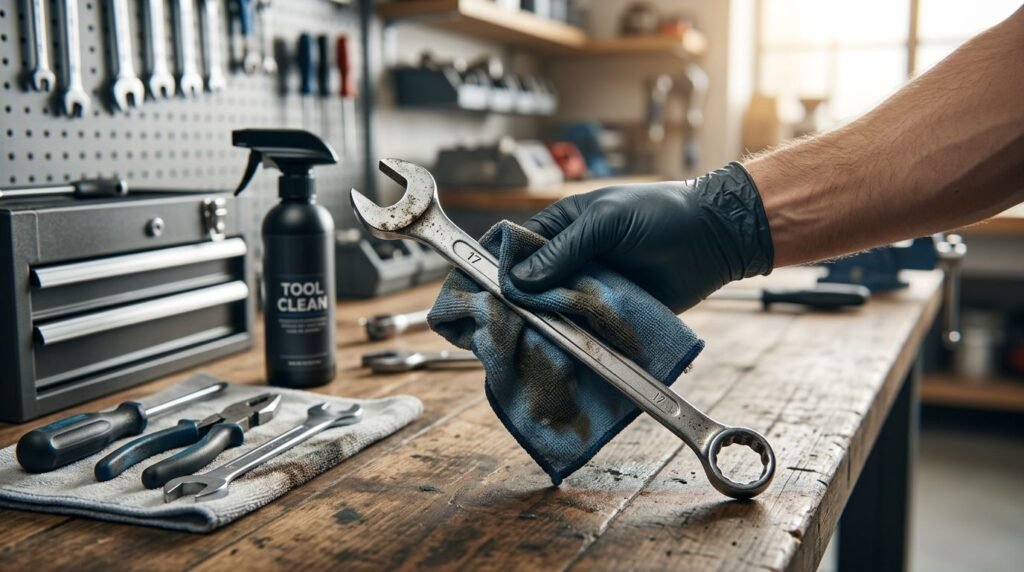
Clean hand tools after every use because dirt, dust, sap, grease, and metal shavings can hold moisture and reduce grip. Wipe light messes with a dry cloth, brush off stuck debris, and wash garden or outdoor tools only when needed. Always dry metal parts before storage.
For everyday tools like screwdrivers, pliers, wrenches, hammers, and chisels, a quick wipe is often enough. For garden tools, mud and plant residue may need a stiff brush or light wash.
Basic cleaning steps
- Wipe dust and dirt with a dry cloth.
- Use a stiff brush for stuck debris.
- Clean grease with a mild cleaner when needed.
- Dry the tool completely after cleaning.
- Do not store tools while wet.
- Clean handles too, not just metal parts.
For tools with joints or teeth, such as pliers, adjustable wrenches, pruning shears, and saws, check hidden areas where dust or sap can build up.
Remove Rust Before It Damages the Metal
Remove rust as soon as you notice it because corrosion spreads and weakens the tool surface over time. For light rust, use fine steel wool, a wire brush, or sandpaper. After cleaning, wipe the tool dry and apply a thin protective coat of oil to exposed metal.
Rust usually starts when tools are left damp, stored in humid areas, or put away dirty. The earlier you treat it, the easier it is to remove.
How to remove light rust
Use one of these methods:
- Fine steel wool for small rust spots
- Sandpaper for flat metal surfaces
- A wire brush for heavier dirt or rust
- White vinegar for stubborn rust on garden tools
- Rust remover for badly affected tools
After removing rust, always dry the tool and protect the metal surface with a light coat of oil. Do not leave excess oil on the tool, because it can attract dust.
Lubricate Moving Parts for Smooth Performance
Lubricate moving parts to reduce friction, prevent sticking, and slow rust on hinges, pivots, springs, and adjustment screws. A few drops of light machine oil usually works for pliers, pruners, adjustable wrenches, and scissors. Wipe away excess oil so dust and grit do not build up.
Any hand tool with a joint needs occasional lubrication. If it opens slowly, squeaks, sticks, or feels rough, it probably needs cleaning and oil.
Tool specific tips (the stuff people always ask about)
Screwdrivers
- Keep tips clean and sharp. Rounded tips slip and chew up screws.
- Don’t use screwdrivers as chisels or pry bars. I know. Everyone does it. Still.
- Wipe shafts down after dirty work, especially around drywall dust. That stuff attracts moisture and grime.
If tips are damaged, consider replacing or regrinding if it’s a higher quality driver.
Pliers and cutters
- Keep the pivot clean and lubricated.
- Don’t cut hardened wire with cutters not meant for it. You’ll chip the edge.
- For cutters, a tiny bit of oil on the cutting edge helps prevent rust spots.
Adjustable wrenches
Adjustables hate grit.
- Brush the worm gear area regularly.
- Add a tiny drop of oil to the worm gear and jaw slide.
- Store them clean so they don’t jam up next time.
Saws
Hand saws and hacksaws rust quickly if ignored.
- Wipe the blade after use.
- For woodworking saws, a little paste wax helps.
- Store saws so teeth don’t hit other tools. Bent teeth and chipped teeth are annoying and avoidable.
Hammers and Striking Tools
- Keep faces clean. Mushrooming on metal handled striking tools should be dressed down for safety.
- Check handle fit. A loose head can fly off.
- Store in a way that doesn’t crush handles or chip faces.
Apply a small amount of oil at the moving point. Open and close the tool several times so the lubricant spreads evenly. Then wipe off extra oil with a clean cloth.
Sharpen Cutting Tools Safely
Sharpen cutting tools when they start to crush, tear, slip, or require extra force. Sharp edges make cleaner cuts and can reduce strain, but sharpening must follow the factory bevel. Secure the tool, wear eye protection, file away from your body, and finish by oiling the blade.
Dull tools are frustrating. They also force you to push harder, which can make the tool harder to control.
Hand tools that need sharpening
- Chisels
- Hand planes
- Knives
- Scissors
- Pruning shears
- Loppers
- Axes
- Hoes
- Shovels
- Saws, depending on blade type
Use the correct sharpening tool for the job. A file works well for larger edges like axes, hoes, and shovels. A sharpening stone is better for chisels, knives, and plane blades. For pruners, a small file or sharpening tool can restore the edge.
Simple sharpening tips
- Clean the blade first.
- Follow the original cutting angle.
- Secure the tool before sharpening.
- Use smooth, controlled strokes.
- Do not remove too much metal.
- Oil the blade after sharpening.
If you are not confident sharpening expensive tools, take them to a professional. No shame there — better than turning a chisel into modern art.
Store Tools in a Dry, Organized Place
Store hand tools in a dry, organized place to prevent rust, edge damage, lost parts, and clutter-related accidents. Use pegboards, shelves, tool chests, racks, or drawer organizers. Keep sharp edges covered, avoid piling tools together, and add silica gel packs or moisture absorbers in damp storage areas.
Poor storage is one of the fastest ways to ruin good tools. When tools are tossed into a pile, metal parts scratch, blades become dull, handles crack, and small tools disappear into the void.
Best storage options
- Pegboards for frequently used tools
- Tool chests for full workshop storage
- Drawer inserts for small hand tools
- Wall racks for garden tools
- Magnetic strips for metal tools
- Tool rolls for chisels and carving tools
- Plastic bins with labels for accessories
Keep tools off damp floors. Avoid storing them near leaks, open windows, wet concrete, or humid corners. For garages and sheds, moisture control matters a lot.
Inspect Tools Before You Start Work
Inspect tools before each use so small problems do not become safety risks or expensive replacements. Check for loose heads, cracked handles, bent jaws, dull blades, rust, missing screws, and sticky moving parts. Repair minor issues quickly, but replace tools that are cracked, badly bent, or unsafe to control.
A quick inspection takes less than a minute, but it can save your project — and your fingers.
What to check
- Loose hammer or axe heads
- Cracked wooden handles
- Splintered grips
- Bent screwdriver tips
- Worn wrench jaws
- Rust near joints or edges
- Dull cutting blades
- Sticky hinges or pivots
- Missing screws or bolts
- Mushroomed chisel or punch heads
If a tool feels unstable, stop using it. Clean, repair, tighten, sharpen, or replace it before continuing.
Maintain Wooden, Plastic, and Rubber Handles
Maintain handles because the handle controls comfort, grip, accuracy, and safety. Wooden handles should stay smooth, dry, and free from cracks or splinters. Plastic and rubber handles should be checked for brittleness, looseness, or slippery residue. Replace damaged handles instead of forcing risky repairs.
People often care for the metal and forget the handle. Big mistake. A strong blade or hammer head is not very useful if the handle is cracked, loose, or slippery.
Handle care tips
- Sand rough wooden handles lightly.
- Apply linseed oil to dry wooden handles.
- Wipe rubber grips clean after use.
- Remove grease from plastic handles.
- Replace cracked or loose handles.
- Do not tape over serious handle damage as a permanent fix.
A clean, secure handle gives better control and reduces hand fatigue during long projects.

Credit: www.iredellhealth.org
Use the Right Tool the Right Way
Use each hand tool only for its intended job because misuse damages tools and increases accident risk. Do not use screwdrivers as chisels, wrenches as hammers, or blades as pry bars. Choose the correct size, keep your workpiece stable, and stop if the tool feels loose or unsafe.
Many tools break not because they are low quality, but because they are used for the wrong job. A screwdriver is not a pry bar. A wrench is not a hammer. A chisel is not a can opener. Your tools are silently begging for better treatment.
The Mistakes That Quietly Destroy Tools
A quick list, because it’s easy to accidentally do these.
- The Mistakes That Quietly Destroy Tools
- A quick list, because it’s easy to accidentally do these.
- Putting tools away wet. Even slightly.
- Storing tools in leather sheaths long term. Leather can hold moisture and tanning chemicals that promote corrosion. Great for carrying, not always great for storage.
- Leaving tools in the open in a damp garage. Rust will win.
- Using compressed air to blow dust into moving parts. Sometimes it pushes grit deeper.
- Over oiling. Pools of oil attract dust and create sticky grime.
- Using harsh solvents on grips. They get slick or cracked.
- Ignoring small rust spots. They spread and become pitting.
- For additional information on tool maintenance, you might find this technical order helpful. This USDA publication also provides useful tips on maintaining measuring tools and ensuring their longevity.
The right tool makes the job easier, cleaner, and safer.
Simple Hand Tool Maintenance Schedule
A simple maintenance schedule keeps hand tool care easy to remember and consistent. Clean and dry tools after every use, inspect them before starting work, lubricate moving parts monthly or when stiff, sharpen blades when performance drops, and do a full toolbox check at least once per season.
You do not need a complicated system. Just follow a routine based on how often you use your tools.
After every use
- Wipe off dirt and dust.
- Dry tools before storing.
- Put each tool back in its place.
- Check for obvious damage.
Weekly or after heavy use
- Brush off stubborn debris.
- Remove light rust.
- Clean handles.
- Check joints and moving parts.
Monthly
- Lubricate hinges and pivots.
- Sharpen frequently used cutting tools.
- Check toolboxes for moisture.
- Replace worn storage covers.
Seasonally
- Inspect the full tool collection.
- Treat wooden handles.
- Deep clean garden tools.
- Replace unsafe tools.
- Reorganize storage areas.
Frequently Asked Questions
Hand tool care FAQs usually focus on cleaning frequency, rust prevention, sharpening, lubrication, and safe storage. The best answer is to build small habits around every use instead of waiting for tools to fail. Clean, dry, inspect, oil, sharpen, and store tools properly to extend their working life.
How Often Should I Clean My Hand Tools?
Clean hand tools after every use, especially if they touched dirt, water, grease, sap, or metal shavings. For light indoor use, wiping with a dry cloth may be enough. For garden or outdoor tools, remove soil and moisture before storage.
What Is The Best Way To Prevent Rust On Hand Tools?
The best way to prevent rust is to keep tools clean, dry, and stored away from moisture. After cleaning, apply a thin coat of oil to exposed metal parts. Use silica gel packs or moisture absorbers if your toolbox or shed gets humid.
Can I use vinegar to remove rust from tools?
Yes, vinegar can help loosen rust on some metal tools, especially garden tools. After soaking, scrub the rust with steel wool or a wire brush, rinse if needed, dry the tool completely, and apply oil to protect the surface.
How Do I Sharpen Hand Tools Safely?
Use the correct sharpening stone or file for each tool type. Maintain a consistent angle while sharpening. Always wear safety gloves to protect your hands.
Can I Use Household Items To Maintain My Hand Tools?
Yes, household items like vinegar can remove rust. Sandpaper or steel wool works for cleaning surfaces. However, specialized products offer better, longer-lasting results.
Should I oil my hand tools?
Yes, oil metal parts lightly when needed, especially after rust removal, sharpening, washing, or long storage. Moving parts also need occasional lubrication. Use only a small amount and wipe off excess oil so dust does not collect.
When should I replace a hand tool?
Replace a hand tool when it is cracked, badly bent, loose, heavily rusted, or unsafe to control. Minor rust, dull blades, or dry handles can often be fixed. But if the tool may fail during use, replacing it is the smarter choice.
Which hand tools need sharpening?
Cutting tools need sharpening. Common examples include chisels, knives, scissors, hand planes, pruning shears, loppers, axes, hoes, shovels, and some saws. If the tool tears, slips, crushes, or needs extra force, the edge may be dull.
Conclusion
Good hand tool care is not complicated. The best approach is a repeatable routine: clean after use, dry completely, oil moving parts, sharpen cutting edges, inspect for damage, and store tools away from moisture. These habits protect your tools, improve performance, and make every project smoother.
A well-maintained toolbox saves money, reduces frustration, and helps every tool do its job properly. Start with the basics today: wipe, dry, inspect, oil, sharpen, and store. Your future projects will thank you.

Michael Harris is an experienced woodworker and power tool expert with over 12 years in woodworking. Specializing in functional, high-quality furniture, he offers expert advice on tool selection, maintenance, and sharpening for both beginners and professionals.